0%

A Pitch Roof Container House combines recycled steel modules with a sloped roof that improves drainage, ventilation, and interior comfort. This design can look simple, but successful construction requires careful planning. Container dimensions, roof loads, insulation thickness, and local weather conditions must work together. A beautiful concept can still fail without practical engineering.

This guide explains how to develop the design from the ground up. It covers site assessment, container selection, structural reinforcement, roof framing, insulation, windows, plumbing, and electrical planning. Experienced builders usually inspect each container for corrosion, twisting, damaged corner posts, and previous chemical exposure. Small defects matter. They can become expensive problems after installation.

The roof deserves special attention. A suitable pitch helps rainwater move away quickly, while generous eaves protect doors and exterior walls. Steel transfers heat rapidly, so a complete insulation system is essential. Ventilated roof cavities, reflective barriers, and carefully sealed openings can improve indoor comfort. However, no single solution fits every climate. Some plans will need revision after reviewing sun exposure, wind direction, and seasonal rainfall.

Reliable results depend on qualified professionals, accurate measurements, and approval from the relevant local authorities. Structural calculations should confirm the container modifications and roof connections. Energy performance, fire safety, drainage, and accessibility also deserve early consideration. A practical home is not defined by its unusual appearance. It is defined by safety, durability, comfort, and honest attention to detail.
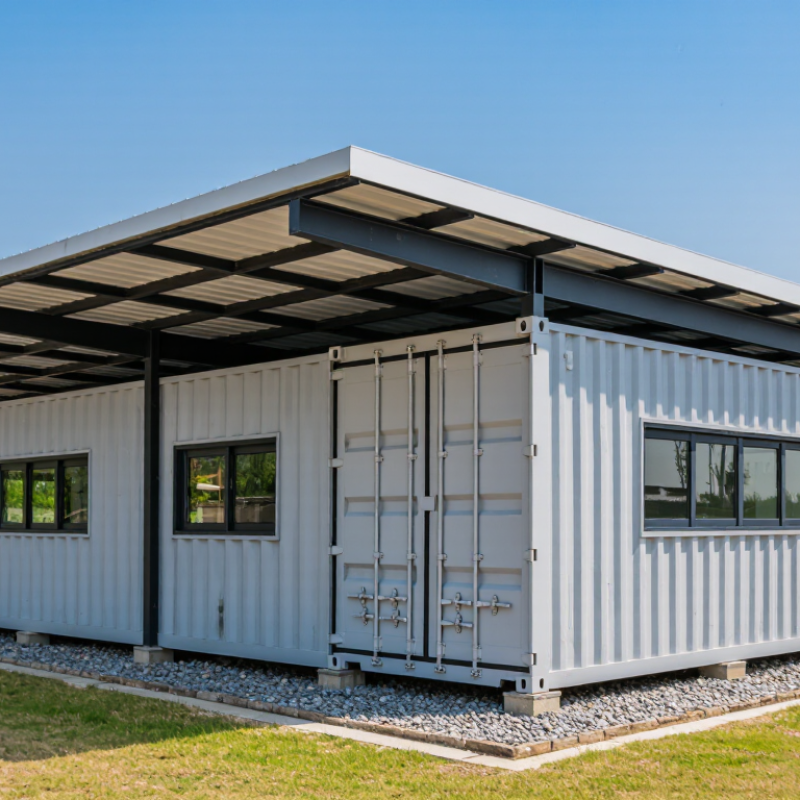
How to Build a Pitch Roof Container House

Assess Site Loads and Codes for ISO Container Housing Design

How to Build a Pitch Roof Container House

Assess Site Loads and Codes for ISO Container Housing Design

Before drawing the roof, measure the site properly. Record soil type, slope, drainage paths, and nearby trees. Check local wind, snow, seismic, and flood requirements. These loads affect both the container supports and the pitched roof frame. A qualified structural engineer should review the calculations. Do not trust a level-looking site.

An ISO container carries loads through its corner posts and top rails. Cutting side panels can weaken that load path. Reinforcement details must be designed, not guessed on site. The foundation also needs suitable bearing capacity and anchorage.

Poor soil can cause uneven settlement, twisting doors, and cracked finishes. A geotechnical report may seem excessive, but repairs cost more.

Review planning rules before ordering materials. Confirm setbacks, height limits, fire separation, insulation values, emergency access, and escape windows. Local officials may require stamped drawings and energy calculations.

The roof needs secure connections, generous overhangs, and controlled drainage. Snow can collect where the roof meets the container wall. Wind can lift wide roof edges. Early sketches often miss both problems. That is a design weakness worth correcting.

Condensation is another concern. Continuous insulation, ventilation, and careful vapor control protect the steel shell and interior finishes. Keep inspection records, product data, and revised drawings together.

Select 20- or 40-Foot ISO Containers with 2,438 mm Exterior Width

How to Build a Pitch Roof Container House

Selecting the right container shapes the entire house. Choose a 20-foot or 40-foot ISO container with a 2,438 mm exterior width. The 20-foot unit is easier to place on narrow sites. The 40-foot unit provides more continuous living space. Standard external lengths are approximately 6,058 mm and 12,192 mm. Always confirm the actual measurements before ordering.

That width includes the corrugated steel walls. Interior space becomes smaller after insulation, wiring, and lining. Measure twice. I recommend checking corner castings, door frames, floor condition, and visible corrosion. A clean structure reduces repair work later. However, a used container may still hide rust beneath paint or flooring. An independent inspection is worth the effort.

A pitch roof should sit above the container, not rely on its thin top panels. Use an engineered frame with suitable drainage, ventilation, and roof overhangs. The extra roof height can improve summer comfort and reduce condensation. Keep openings limited until a structural professional reviews the cutting plan. My first layout allowed too little space around the service wall. It worked, but maintenance became awkward. That mistake changed how I plan utilities now. Check local load requirements, foundation conditions, transport access, and permits before construction begins.

How to Build a Pitch Roof Container House - Select 20- or 40-Foot ISO Containers with 2,438 mm Exterior Width
Data Dimension 20-Foot ISO Container 40-Foot ISO Container Pitch Roof Planning Notes
Nominal exterior length 6,058 mm 12,192 mm Allow additional space for end walls, insulation, service cavities, and roof overhangs.
Exterior width 2,438 mm 2,438 mm The standard external width used for both container lengths.
Standard exterior height 2,591 mm 2,591 mm Suitable where transport height and lower overall building height are priorities.
High-cube exterior height 2,896 mm 2,896 mm Provides approximately 305 mm more external height for insulation, ducts, and interior clearance.
Typical internal length Approximately 5,898 mm Approximately 12,032 mm Actual dimensions vary with container type, floor construction, and end-wall details.
Typical internal width Approximately 2,350 mm Approximately 2,350 mm Insulation and interior lining can reduce the finished width by approximately 100–200 mm.
Typical internal height Standard: approximately 2,390 mm
High cube: approximately 2,695 mm
Standard: approximately 2,390 mm
High cube: approximately 2,695 mm
High-cube units generally offer more practical headroom after ceiling insulation.
Approximate internal floor area 13.9 m² 28.3 m² Calculated from typical internal dimensions before insulation, partitions, and built-in furniture.
Approximate internal volume Standard: 32.6 m³
High cube: 37.4 m³
Standard: 67.8 m³
High cube: 76.3 m³
Usable finished volume will be lower after insulation, services, and interior finishes.
Typical cargo door opening Width: approximately 2,340 mm
Height: approximately 2,280 mm standard
Approximately 2,580 mm high cube
Width: approximately 2,340 mm
Height: approximately 2,280 mm standard
Approximately 2,580 mm high cube
Verify the actual door opening before designing large furniture, glazing, or modular partitions.
Typical tare weight Approximately 2,200–2,400 kg Approximately 3,700–4,200 kg Use the container’s identification plate for structural, transport, and foundation calculations.
Illustrative roof pitch 1:12 rise across 2,438 mm: approximately 203 mm 1:12 rise across 2,438 mm: approximately 203 mm A 1:12 pitch equals approximately 4.8°. Confirm the minimum slope required by the selected roofing system and local code.
Illustrative steeper pitch 1:6 rise across 2,438 mm: approximately 406 mm 1:6 rise across 2,438 mm: approximately 406 mm A 1:6 pitch equals approximately 9.5° and can improve rainwater drainage where permitted.
Recommended roof overhang Typically 300–600 mm Typically 300–600 mm Overhangs help protect container walls and openings from rain; final sizing depends on wind and snow loads.
Best planning use Compact studio, guest unit, office, or one-bedroom module Larger dwelling, two-module layout, or multi-room residential plan The 40-foot option provides more continuous floor area but requires greater transport and foundation planning.
Key construction checks Confirm foundation level, corner support, cut-out reinforcement, insulation, ventilation, waterproofing, and service routing. Confirm foundation level, intermediate support requirements, cut-out reinforcement, insulation, ventilation, waterproofing, and service routing. A qualified structural professional should verify local wind, snow, seismic, fire, energy, and building-code requirements.
Planning values are typical approximations for general comparison. Dimensions and weights vary by container manufacturer, production year, condition, floor system, and container configuration. Always verify the actual container identification plate and measured dimensions before construction.

Engineer a 30°–45° Pitch Roof for Drainage and Wind Resistance

How to Build a Pitch Roof Container House

Engineer a 30°–45° Pitch Roof for Drainage and Wind Resistance

A 30°–45° roof pitch gives rainwater a fast, predictable path away from a container house. The correct angle depends on local rainfall, snow, and roof material. Use NOAA Atlas 14 precipitation-frequency data to check local rainfall intensity before sizing gutters and outlets. Small outlets can overflow quickly during cloudbursts. That detail is often underestimated.

A steep roof does not automatically resist wind. ASCE 7-22 requires wind design to consider location, exposure, building height, enclosure, and risk category. Treat the roof as a connected load path. Bolt the roof frame to reinforced container corner posts, then specify continuous straps, structural screws, and verified uplift connections. FEMA P-55 identifies roof edges, overhangs, and openings as common weak points in high-wind construction. Keep overhangs modest, especially on exposed sites.

Install a ventilated roof cavity above the container’s steel shell. Add corrosion-resistant flashing around penetrations and slope gutters toward accessible discharge points. A 30° pitch may suit moderate climates, while 45° can shed snow and rain more aggressively. Yet steeper geometry can increase wind exposure and framing forces. That trade-off deserves calculation, not guesswork. I would also test drainage during a controlled hose simulation before closing the ceiling. It is not a certified storm test, but it can reveal poor falls, blocked outlets, and careless detailing.

Reinforce Openings and Anchor the Structure Under ASCE 7 Loads

How to Build a Pitch Roof Container House

A pitch roof container house needs more than a sloped roof added above steel boxes. Large openings can interrupt the container’s original load path. Cutting a wall for doors or windows may remove important corrugated steel and corner support.

Frame every opening with designed steel members. Headers carry loads above doors and windows. Vertical jambs transfer forces toward the container’s bottom rails and corner posts. Keep welds continuous where specified, but avoid relying on weld appearance alone. A qualified inspector should check size, continuity, corrosion protection, and heat distortion.

The structure must resist wind uplift, sliding, overturning, snow, and seismic effects identified under ASCE 7. Site exposure, roof slope, building height, and local conditions change these forces. A structural engineer should calculate the load path and connection capacities. Roof framing should connect to reinforced container corners or engineered side frames. Those forces then need a clear route into foundation plates, bolts, and concrete.

Use anchors that resist tension and shear, not only gravity. Check edge distances and concrete strength before installation. Small gaps can become serious movement during storms. I have seen projects focus on roof weight while neglecting uplift at the leeward corner. That mistake is easy to repeat.

ASCE 7 provides loading criteria, not a complete construction plan. Local building requirements may add seismic or frost provisions. Field conditions also deserve attention. Containers are rarely perfectly square, so rigid prefabricated connections may need careful adjustment and verification.

How to Build a Pitch Roof Container House: Reinforce Openings and Anchor the Structure Under ASCE 7 Loads

The chart shows the calculated velocity pressure at representative building heights for a preliminary wind design scenario. Values use the ASCE 7 velocity-pressure relationship with a 120 mph basic wind speed, Exposure C, Kzt = 1.0, and Kd = 0.85.

Higher wind pressure increases demand around container wall openings, pitch-roof connections, hold-downs, and foundation anchors. Final design must also account for enclosure classification, internal pressure, roof zones, exposure, site wind speed, load combinations, and local code requirements.

Install R-Value-Based Insulation, Ventilation, and Moisture Control Systems

How to Build a Pitch Roof Container House

Install R-Value-Based Insulation, Ventilation, and Moisture Control Systems

A pitch roof creates a valuable service cavity above a container’s steel shell. However, steel conducts heat quickly and creates thermal bridges at every frame member. Select insulation by local climate, not guesswork. A continuous insulation layer outside the steel reduces cold spots more effectively than filling cavities alone. Seal joints, penetrations, and door frames with compatible air-sealing materials. Small gaps matter.

Keep the interior vapor-control layer on the warm side of the assembly when climate conditions require it. The exact position depends on seasonal humidity and local building rules. Leave a ventilated channel beneath the roof deck, from low intake openings to a high exhaust point. This airflow helps remove trapped heat and moisture. Protect intake openings from insects and wind-driven rain. Never block the path with insulation.

In practice, condensation often appears around fasteners and unsealed corners first. Check these areas during cold mornings and after heavy rain. A humidity monitor can reveal problems before stains develop. I would also inspect the roof cavity twice yearly, because even good installations change with movement. The first design is rarely perfect. Revise weak details rather than hiding them. An experienced building professional should verify R-values, vapor control, structural loads, and ventilation clearances before construction.

FAQS

What site information should be checked before designing a pitched roof container house?

Measure soil type, slope, drainage paths, nearby trees, and local weather loads. A level-looking site may still settle unevenly.

Why are foundations important for container housing?

Foundations transfer structural forces into the ground. Poor soil can twist doors, crack finishes, and cause uneven settlement. A soil investigation may prevent expensive repairs.

How can wall openings weaken a container structure?

Large doors and windows remove corrugated steel from the original load path. Designed headers and vertical jambs should frame every opening. Do not guess reinforcement details.

How should the pitched roof connect to the container structure?

Connect roof framing to reinforced corners or engineered side frames. The force path should continue through plates, anchors, and concrete. Gravity alone is not enough.

What forces must the structure resist?

The structure should resist wind uplift, sliding, overturning, snow, and seismic movement. Local exposure, roof slope, height, and ground conditions change these forces. Small gaps can become serious movement.

What planning and safety requirements should be reviewed?

Check setbacks, height limits, fire separation, insulation values, access, and escape windows. Local officials may request signed drawings or energy calculations. Review them before ordering materials.

How should insulation and moisture control be designed?

Select insulation according to the local climate and required thermal performance. Continuous exterior insulation can reduce cold spots around steel framing. Seal joints, penetrations, and door frames carefully.

Why does roof ventilation matter above a steel container?

Provide a clear air channel from low intake openings to a high exhaust point. This helps remove heat and trapped moisture. Never block the channel with insulation.

How can condensation problems be detected early?

Inspect fasteners, corners, and roof cavities during cold mornings or after heavy rain. A humidity monitor can reveal hidden problems. The first installation may not be perfect. Revised details are better than concealed weaknesses.

Conclusion

Building a Pitch Roof Container House begins with a careful evaluation of the building site, including soil conditions, climate, snow, wind, and local construction codes. These factors guide the layout, foundation, structural connections, and overall safety requirements. Standard 20- or 40-foot ISO containers, typically 2,438 mm wide externally, can be arranged to create practical living spaces while maintaining efficient transportation and installation.

A roof pitched between 30° and 45° helps direct rain and snow away from the structure while improving resistance to wind when properly engineered. Any doors, windows, or large openings should be reinforced, and the containers must be securely anchored according to applicable structural load standards. Interior comfort depends on insulation selected by target R-value, continuous ventilation, and effective moisture control. Together, these measures create a durable, energy-conscious, and code-aware container home suited to its local environment.


Alexander

Alexander

Alexander is a professional marketing specialist dedicated to helping businesses understand practical solutions, emerging market trends, and the value of reliable products. With extensive knowledge of the company’s product portfolio, he combines technical understanding with clear, customer-focused......

Let's start your project — from drawing to delivered module.

Contact Us